In part 1 I talked about the basic routing setup you need to do basic pitch correction using a digital console, a Dante audio network, and Ableton. At the end of that post, I warned against simply tuning to a chromatic scale, which can lead to tuning “misses” that easily make your vocals sound worse than they did without pitch correction.
In part 2, I’m going to show you how we use MIDI clips in Ableton to automatically set the tuning key for our tuning plugin for each song, making it almost impossible for our vocals to ever be tuned out of key! As a reference, feel free to download our Ableton set here (audio clips will be offline) if you need a reference or a starting point for your set.
Our Ableton set
Everyone’s Ableton setup is a bit different. Our drummer wrote a post that goes into some detail on our set here, but essentially, we use Ableton in session view with a scene for each song that contains the tempo and time signature for each song.
It really doesn’t matter how you use Ableton as long as you can fire a MIDI clip every time you change keys, probably at the beginning of every song (or I guess every modulation if you’re into that sort of crazy 90’s awesomeness 😂).
Okay, let’s get the hard part out of the way first: setting up a MIDI IAC loopback…
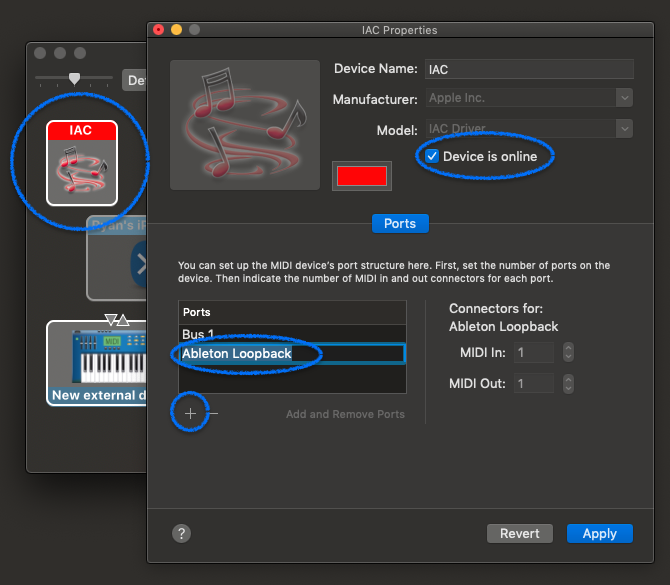
1. Creating a MIDI loopback for Ableton control
By default, MIDI notes fired from Ableton cannot be MIDI mapped to control Ableton. Because our ultimate goal here is to control an Ableton plugin parameter with a MIDI note we need a way to make this happen. To do so, we’re going to create a MIDI IAC device we can use to loop MIDI notes out and then back into Ableton in a way that will allow us to map them to Ableton parameters for control.
So, to start, open Audio MIDI Setup, show the MIDI Studio (⌘-2), open the IAC device (red panel), bring it online, and add a device for Ableton loopback:
2. Configuring Ableton to receive MIDI control from the IAC loopback
Next, open your Ableton preferences (⌘-,) and go to the MIDI Sync tab. Make sure “Track” and “Remote” are enabled for the loopback device input, and “Track” for the output:
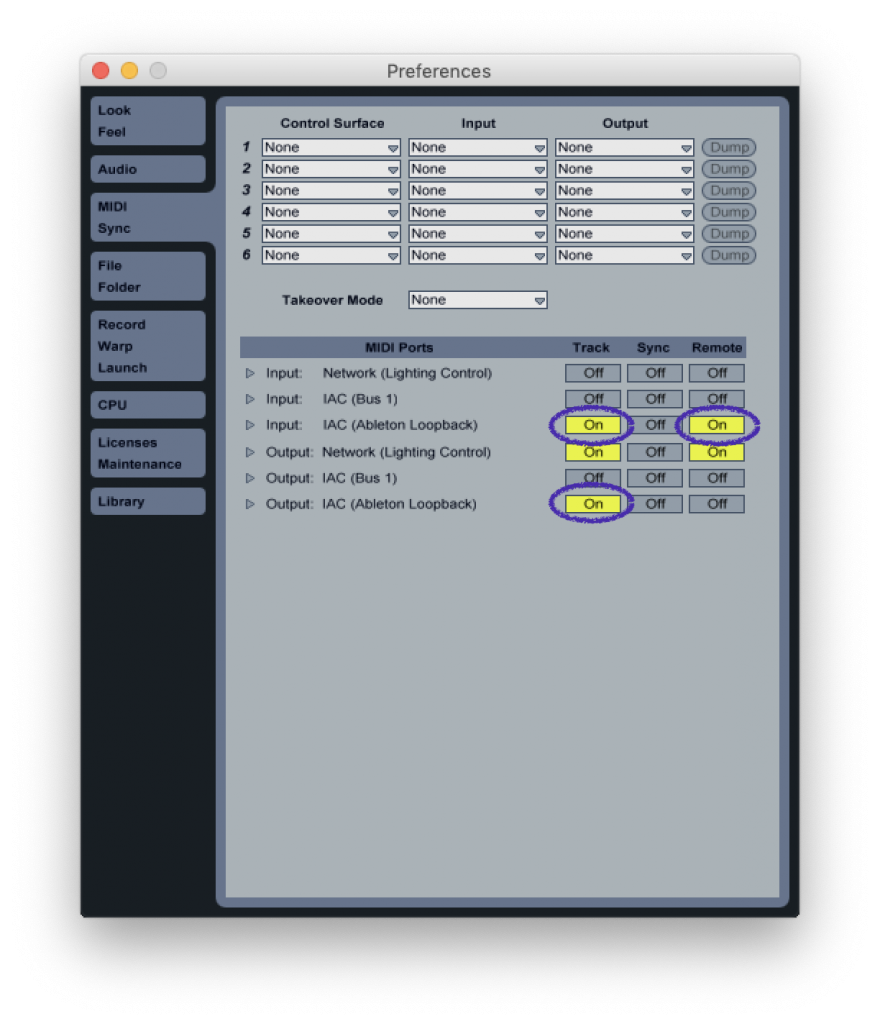
We need both “Track” and “Remote” on the input to ensure Ableton will use this MIDI input for MIDI mapping controls.
3. Setting up an Ableton MIDI channel for MIDI control
The next part is pretty straightforward, create a new MIDI track (⇧-⌘-T), and set the “MIDI To” to the IAC loopback device:

To be safe, it’s best to set the “MIDI From” to none. It’s possible to create a MIDI feedback loop here that will immediately max out your CPU and could cause Ableton to crash.
4. Creating a MIDI clip to control an Ableton audio effect rack parameter
Okay, just a reminder at this stage that our goal is to use a MIDI clip to control the tuning key of a plugin. Because of the way MIDI control works in Ableton, we’re going to need some sort of variable control so we can essentially send a value that will be mapped to the range of options available on the plugin parameter (tuning scale root). I found the best option for this was to create a MIDI clip with a MIDI CC value in it.
To do this, create a new MIDI clip (⇧-⌘-T) in the MIDI track you just created. Here is a picture of the MIDI clip I use to set the pitch correction to the key of C, take a look and I’ll break down all 6 options I’ve highlighted:
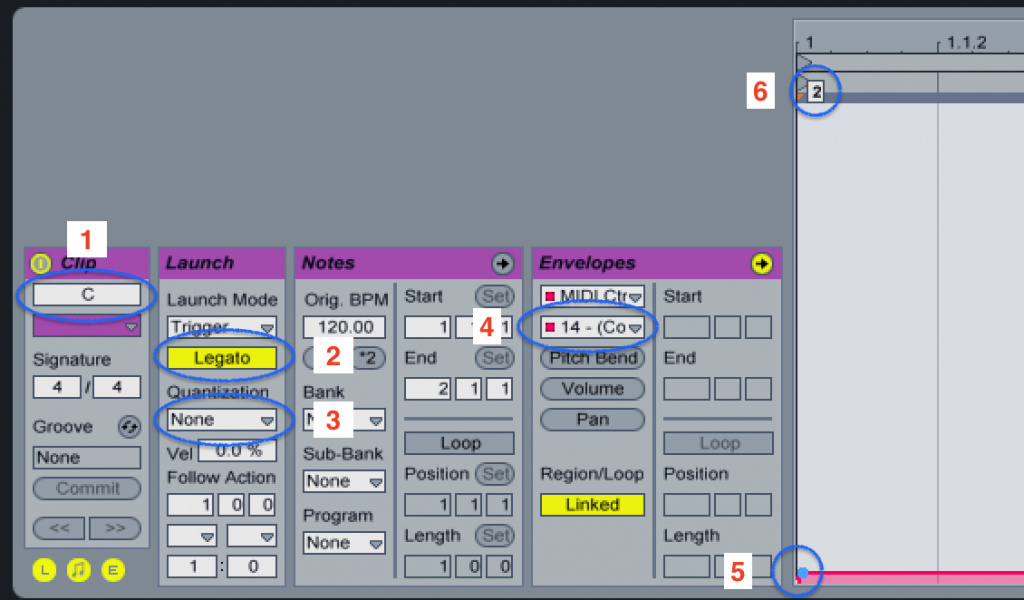
- The name of the clip. I’ve named it the note of the scale root this clip is used for.
- Set the launch mode to legato so it will take over immediately
- Set the quantization to “None” so we don’t have to wait for a quarter or bar before the clip is launched
- Select a MIDI CC control value you’ll configure. Which one you use doesn’t really matter, as long as it doesn’t conflict with any other CC values you’re using for other purposes.
- This is the tricky part: we need to create an envelope that ends with a CC value that will correspond with the correct tuning key in the plugin. This envelope is tiny but does what is needed.
- This shows the value of the final point in the envelope. Here, “2” essentially represents “the scale root key of C” to the plugin.
I know that is a lot, but once we’ve set up the MIDI mapping I think what we’re doing here will start to make sense.
5. Mapping the MIDI CC to the tuning plugin
This may be the most awkward part of the whole tutorial. What we need to do now, is somehow play that note back while we’re in MIDI map mode so we can map that CC signal to the correct parameter. The way I did this was by putting the MIDI clip into loop mode, playing it, and then (while it continues to play) enabling MIDI map mode and selecting the tuning plug-in scale root parameter:
It’s a bit tricky to do, partly because you may accidentally map that CC to some other parameter (track selection, etc.) if you happen to have it selected when the MIDI clip loops and fires, however, once you have that CC mapped once you are all set to replicate that clip and simply change the CC values to set different keys.
Once you have that CC mapped and a clip ready to go, you should be able to change the scale root to some other value, and see it get set back to C when you play that MIDI clip. If that isn’t working for you, go carefully back through the steps before continuing, otherwise, you’ll end up having to re-do a lot of the following work!
6. Setting up MIDI clips for the rest of the keys
Quite likely you’re going to play in a key that isn’t C, so obviously we now need to replicate that MIDI clip, and change the CC envelope so it sends a final CC value that represents the target key you want. I spent some time figuring out all the values, and created clips that represented every major key so I could simply duplicate the clip for the key I want for each song. Here are the CC values and the corresponding key for Waves Tune Real-Time if you’re using the major key setting:
- C, CC value 2
- C#, CC value 10
- Db, CC value 15
- D, CC value 22
- Eb, CC value 38
- E, CC value 47
- F, CC value 56
- F#, CC value 63
- G, CC value 77
- Ab, CC value 98
- A, CC value 107
- Bb, CC value 121
- B, CC value 125
Each of these values is really a range you have to be in for the scale root to get set to that key, but these are the final numbers I used. These could also be different if you’re using a different plugin or a scale type other than major, but I’m guessing for 90% of you these should work! Just duplicate the first clip you created, and change the envelope so the final CC value is the value above that matches the key you want.
Once you have that done, you’ll have to replicate that vocal track for each vocal channel you want to tune, and then once again map that MIDI CC to the scale root of the plugin for each track. Unfortunately, when you replicate a track in Ableton it does not replicate the MIDI mapping at the same time.
The finished Ableton session view
Here is what a worship set’s session ultimately looks like for me:

From left to right my tracks are:
- Backing track or stem for the song we’re playing
- A guide track (if we’re using one)
- A reference track (these are drum up-mixes I use just for practice)
- A “Vocal Tuning” group with an audio track for each vocal I’m tuning
- Vocal audio tracks one through 5, with the tuning plug in on each one
- The “Tuning Root” MIDI track that contains the MIDI clips that will set the root of the tuning plugin on each of the vocal channels.
At this point, you should be all set! Just copy the MIDI clip for the key of the song into the right scene, and when you launch that scene to set the tempo and time signature, you’ll be setting the tuning key right along with it!
I also took some time to create MIDI clips with separate CC’s I can use to enable or disable the tuning plugin altogether, in case we ever have a problem and I need to bypass the tuner. You could also create clips to set the key type (if you’re playing a song in a minor key for example) or any of the other plugin parameters you want to fine-tune for a particular song.
In case you missed the link at the top, you can download a copy of our Ableton set, complete with our MIDI clips and everything from here. Just keep in mind that the audio files will be offline, and the audio and MIDI inputs and outputs will not work unless you configure them for your setup.
Hey Ryan thanks for the info. Are you able to use these midi clips in arrangement view or is there a different process for it to work properly in arrangement view?
Absolutely you can use them in arrangement view! Everything is the same in terms of channel setup, just drag the clips into your arrangement and you should be good to go!
Glad you found it useful.
Thanks Ryan.
I am trying to follow your tutorial, however I am stuck on step 5 as I am not sure how you are mapping to the waves plugin?
Hmm, sorry you got stuck! I’m going to try to post a video for that part since it’s quite confusing.
Essentially you need to start playing the MIDI clip you’re going to use to control the plugin. Then, while it’s playing, go to MIDI map mode (button in the top-right of Ableton), and then select the plugin parameter you want to control, and let the MIDI clip play so Ableton maps that MIDI parameter to the plugin parameter.
I’ll let you know when I’ve updated the video!
…just updated it! Check out the video here.
I hope that helps.
Hey Ryan thanks for the video that did help, however I must not be making the Midi cues correctly even though I followed all the steps there is no midi being sent from Ableton when I did it?
I did finally get it to work, but that is because I copied the midi cues from the template you posted; so not sure what I did wrong with the midi clips as I have never used the cc values.
Glad you got it working! Hard to say what you had wrong with your cues without seeing your project.
Thanks for this great information! I was looking around your Ableton set and saw that you also included an Enable and Disable MIDI signal. I tried to make my own…. but could not get either to turn the plugin on/off. Do you have any suggestions?
Glad you liked it! Okay, first of all, if you’re using the arrangement view the best way to turn the plugin on/off is to use Ableton’s built-in automation features. If you’re in session view, you need to use an IAC MIDI device (on macOS) to feed MIDI out of an Ableton track and back in as a control signal you can map to something (like any other MIDI device). That’s what the first part of this post is about–if you can’t get it working, comment again and I’ll send you an email so we can hop on a phone call. I’d love to walk you through it!
great content! any chance you have ever midi mapped directly to waves sound grid from Ableton? I am stuck at trying to send a signal to another computer to engage and recall snapshots? any idea?
Sadly I haven’t been able to work with Soundgrid yet. What sort of options does it give you for MIDI input?