
As the main technical/production guy for a relatively small church, a lot of what I do has to do with squeezing every ounce of capability out of the little bit of gear we can afford, and I know I’m not the only one! Today, I wanted to share with you our simple live pitch correction setup we’ve begun using for our vocals during our sets. Integrating this into our existing setup cost us a total of $49.99 (the sale price for Waves Tune Real-Time).
Like us, a lot of churches are already running clicks, guides, and tracks through Ableton, so the nice thing about this set up is that you don’t need another computer or new software (besides the Waves plugin)! Obviously we’d all love to have dedicated computers for everything, but I’m guessing many of you, like me, don’t have the budget for that this year…
Initially, I was skeptical of the idea of doing live pitch correction, anticipating oncoming disastrous moments like these 😂:
However, once we got our set up tested and running properly I’ve really been pleasantly blown away by the subtle yet significant impact it’s had. We’re not using it to “fix terrible vocalists”, but it really has helped locked everything in, and our harmonies and parts now sound
Well, enough preamble, let’s get started…
Part One: Routing vocal audio through an Ableton channel for processing
Before I jump into our routing configuration, let me give you some information on what I’m working with: we’re using the Allen & Heath GLD-80 digital console with the Audinate Dante I/O card. I wrote a three-part series on our whole GLD-80/Dante setup starting here if you want more info.
The key here is that we’re using a digital console and a Dante network and although you can set this up using an analog desk and an audio interface, or with other digital audio networks, this post is going to be based on Dante.
Okay, with that in mind, here is the signal flow goal we’re going to set up:
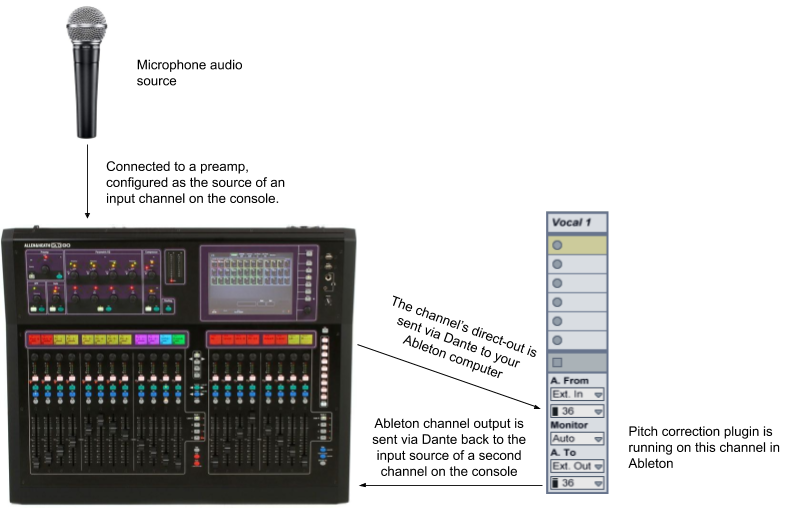
When you’re done, you’ll have two channels for each pitch-corrected vocal. Although that may seem odd, there are a couple good reasons to set up your pitch correction this way:
- Most of us don’t have a dedicated monitor desk, so we need some way of having a non-pitch-corrected channel we can use for monitors (you don’t want to send tuned vocals to your vocalists!)
- This gives you a sort of failover configuration: if your Ableton computer stops working or the Dante network goes down for some reason, you can always bring the original vocal channel into the mix
- If you’re using a GLD-80 like us, there isn’t a lot of flexibility in routing channel inserts. We use on-board multiband compression via a channel insert on most of our vocal channels, so we would lose that processing if we ran our pitch correction as a channel insert
If you do have a dedicated monitor desk or some other way to feed the signal back to your monitors, you can consider using a channel insert to do your pitch correction instead of the channel direct-out which will keep you from eating up your console’s input channels. Just keep in mind that routing audio over Dante to an Ableton setup can easily introduce 10ms or more of round trip latency.
Let me walk you through setting this up on a GLD-80. I’ll assume you already have a vocal channel set up on your console, so let’s start from there:
1. Send the channel’s direct out to the Dante network
First, get the DSP input channel number of the channel you’re working with. On the GLD-80, the channel number for the selected input channel is shown on the top-left of the processing window:
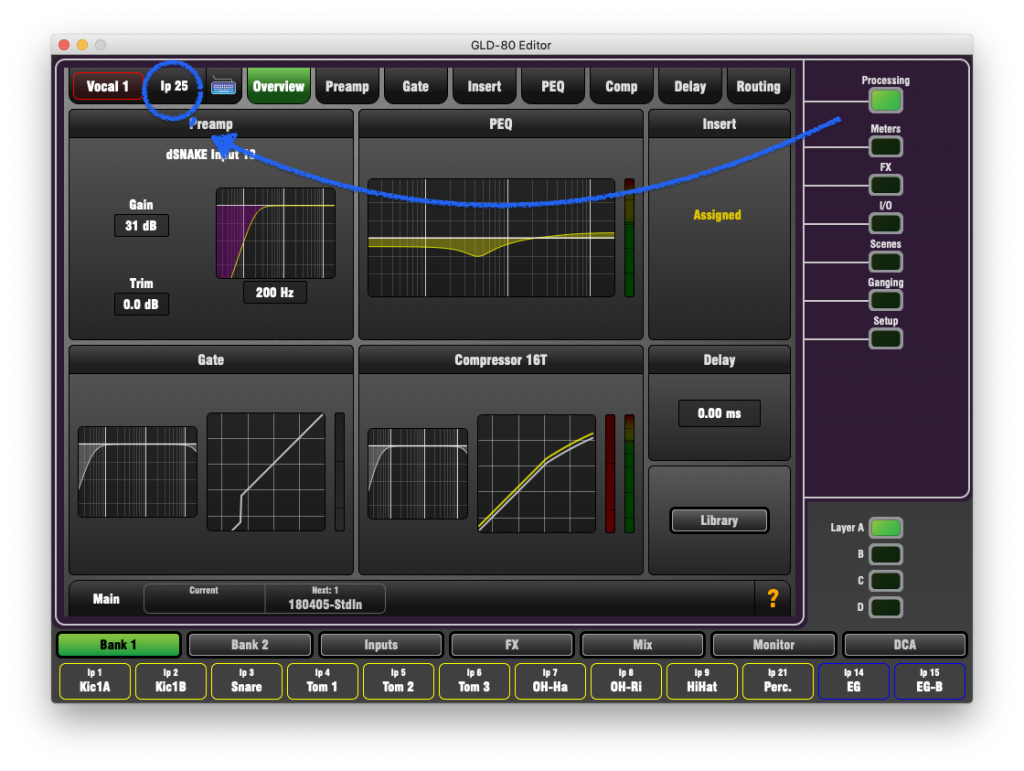
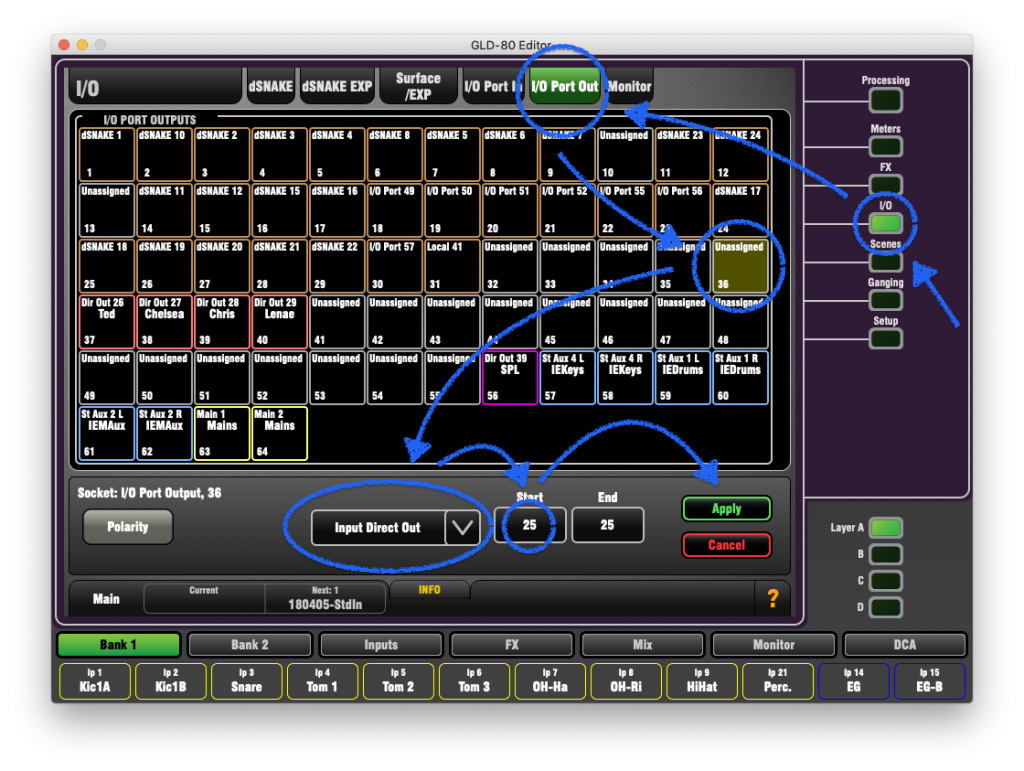
Then, go to the I/O window and select the I/O Port Out tab. Select the Dante output channel you want to use, and configure it as the direct output for the input channel you’re working with (25 for us):
Obviously, these steps will look different for every console, but regardless of the console you’re using I’m hoping this gives you enough to go on.
2. Set up a new input channel to receive the pitch-corrected audio
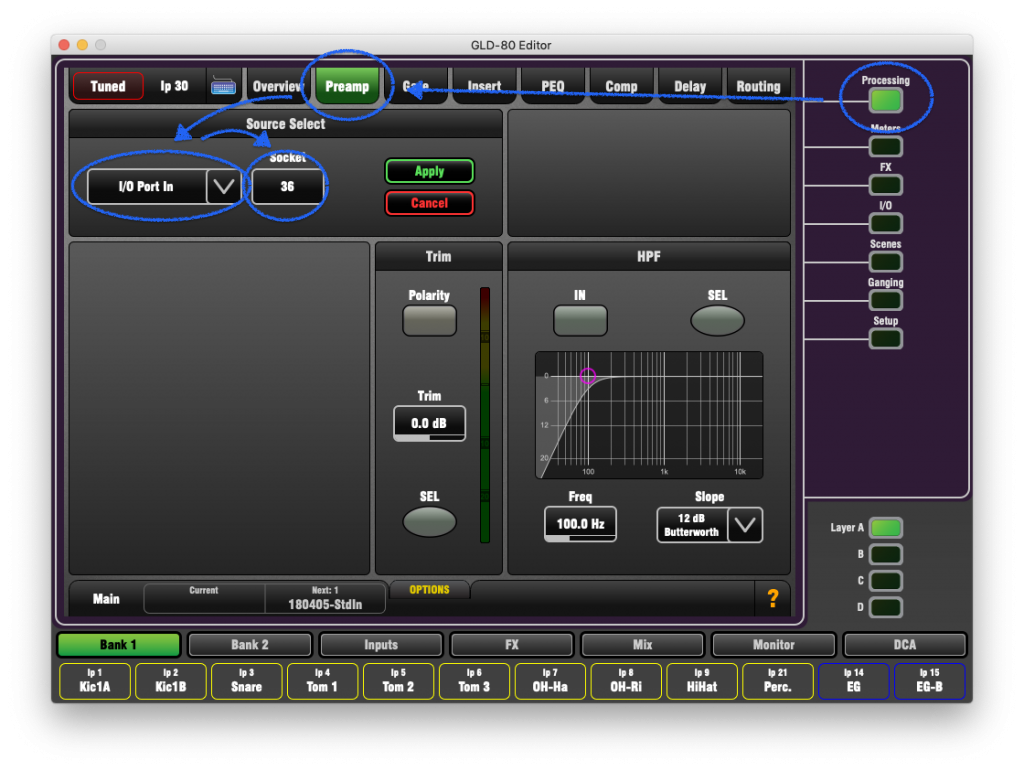
Before we move on, let’s set up a new input channel to receive the pitch-corrected vocal audio from Ableton. I’d recommend resetting the channel you select, and then copying the routing from the original channel to the new channel.
On the GLD-80, you can do this by holding “copy” and pressing the physical “sel” button under “routing” to the left of the screen, and then holding paste and pressing the select button of the destination channel
Once you have an input channel ready, set that input channel’s preamp source to be the I/O input channel you’ll use on the Dante network. On the GLD-80, this means going to the processing window, selecting the preamp tab, and setting the source to the I/O port input channel:
3. Route the audio from your console to Ableton via the Dante network
Now that this vocal channel is available on the Dante network we need to send it to your Ableton computer. I won’t go through the steps in detail, but I’ll assume that your pitch-correction computer has:
- Dante Virtual Soundcard installed and activated
- A working network connection to your Dante network
- Ableton installed, and Dante Virtual Soundcard selected as the audio input and output interface
To
You’ll see that I’ve labeled these console output channels “insert sends” on the Dante network. I’ve essentially reserved a range of I/O channels on my GLD-80 as send/returns I can use for doing software processing.
At this point, if you talk into the microphone we’re setting up the signal indicator in Dante should show green to indicate signal being transmitted to the receive channel on your Ableton computer (channel 3 in my case).
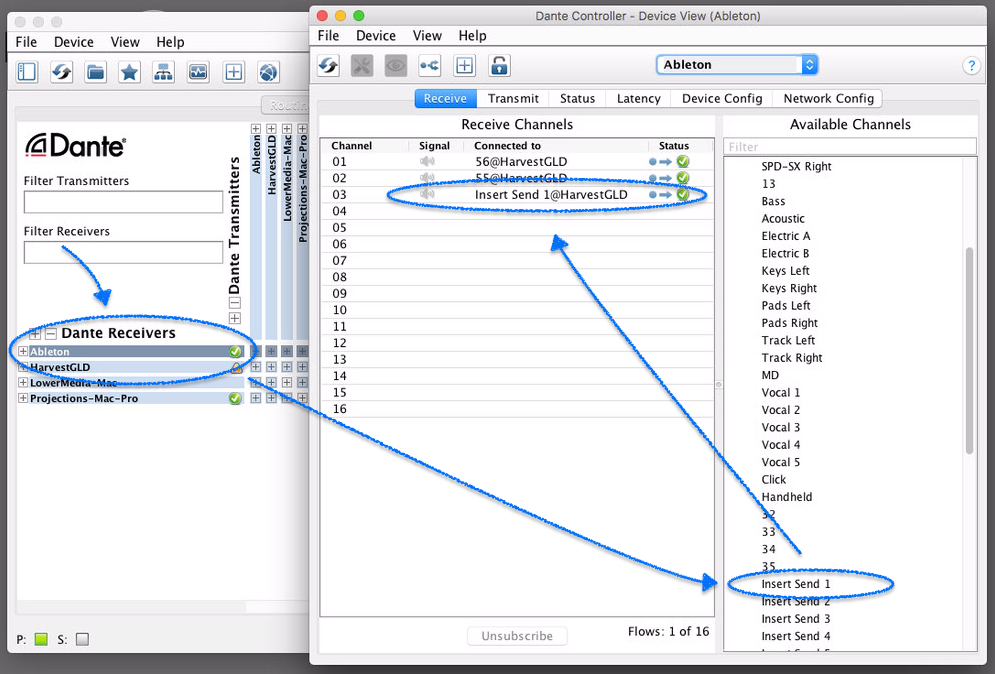
4. Route audio from Ableton to your console via the Dante network
While we have the Dante Controller open, let’s set up the routing from Ableton back to the input channel on your console you set up in step 2. To do this, you’ll need to open up your console from the Dante Receivers list, and expand the device representing your Ableton computer on the right, and drag the output channel you’ll use in Ableton to the I/O input channel on your console:

5. Configuring Ableton for Live Pitch Correction
Okay, most of the boring hard work is out of the way, now to do something interesting with the audio! Open up Ableton, and make sure you have the Dante Virtual Soundcard selected as the audio input and output. If you’re confident your computer can handle it, you may want to shrink the buffer size. Unlike clicks and tracks where latency doesn’t matter (because any output latency isn’t relative to anything else), doing live audio processing is somewhat latency-sensitive, so unless we set up delay compensation for all our other channels, we’ll want to keep the latency on our vocal processing to a minimum, and a small Ableton buffer size can help us do this (although it will result in pops and other issues if the CPU ends up overwhelmed). On my 2016 MacBook Pro I’m able to run tracks, guides, click, and tune 5 vocal channels with a 128 sample buffer without any significant CPU utilization.
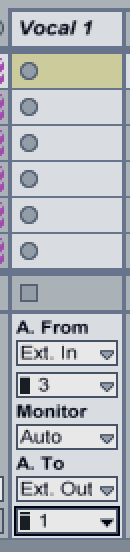
Next, create a new audio channel that will represent the vocal channel in Ableton. Set the input to “ext. in”, and select the Dante channel you used to receive the direct output audio in step 3 (channel 3 for me). Also set the output for the channel to “ext. out” and select the channel we used to send the pitch-corrected audio in step 4 (channel 1 for me):
At this point, do a quick test: hit the “record” button on that Ableton channel and talk into the microphone. You should see audio coming into that external input in Ableton, being sent back to the output, and being received on your “tuned” channel on your console! If not, start from the microphone and check your routing again moving towards your Ableton system to ensure all your channel assignments are correct. Once you have it working, all you have to do is drag the Waves Tune Real-Time plugin onto that channel and you’re ready to start tuning:
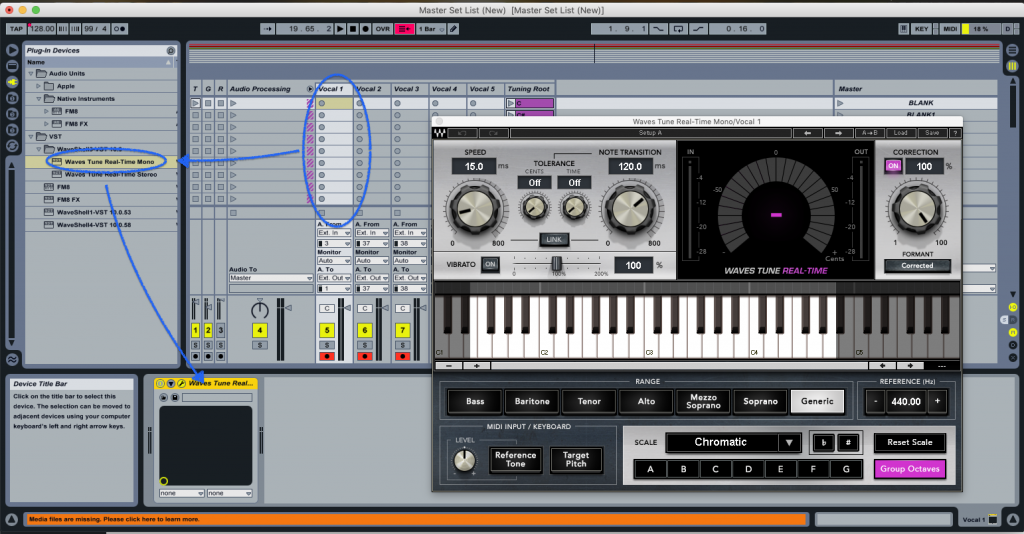
Now if you sing into the microphone, you should start to see the plugin detecting the input note, and correcting it up or down, by default to the nearest chromatic scale note.
Fine-tuning (haha…) the plugin settings will mostly be a matter of preference. Waves
Having said that: tuning to a chromatic scale is risky! I’m not a vocalist (read: can’t sing event remotely well), but even a decent vocalist (maybe even a good volunteer worship vocalist?) may at times hit a note distant enough from the
Think about it this way: if I want to tune to a C note, I need to be within a quarter-tone below or above that C note. If I’m just outside that range, my note will be tuned to a B or a C# and will end up actually sounding much worse than it would have without any tuning. To fix this, you want to tune not just to the chromatic scale, but to the major (or minor) key of the song you’re playing. When turning to the major scale, you’re usually doubling the range of the input note that will still be corrected to the correct output note (depending on which note it is), giving your vocalists a much better chance of being tuned correctly.
We first tried pitch correction at a team night using the default chromatic scale settings. It sounded good, but there were enough tuning misses that we decided we needed to tune to the major key the band was playing to be safe.
To learn how we use MIDI clips to automatically set the tuning key in Ableton, continuing reading part two here!