
Why do you need good comms?
As soon as your church production crew grows beyond the bounds of a single booth, communication becomes a challenge. You can no longer lean over and chat with the audio guy, or yell over the music to lighting operator to make sure he hits that main preach front lighting cue.
Good communication is key to a successful production anywhere, and with many small churches (including mine) launching or growing their live video production for streaming, I thought I’d share my own experience and the success (such as it may be) we’ve had using a great free program called Mumble to drive our audio, video, lighting, and camera directing comms for Sunday mornings.
Why Mumble?
Before you keep reading and get into the technical details of setting up Mumble, make sure you take the time to evaluate your options. Mumble is far from the best production communications system, but it’s also definitely not the worst for many scenarios. In order from worst (and least expensive, and easiest to set up) to best (and most expensive, and most complicated to set up), I think your options are something like this (in all seriousness):
- Talking/shouting (perfectly acceptable in many scenarios!)
- Group text, or group voice call (Facebook Messenger, FaceTime, Zoom, etc.)
- Mumble, or something similar (maybe Teamspeak, but I couldn’t make it work for us)
- Unity Intercom
- Holland Mars T1000 (or similar)
- Clear-Com or similar professional party line systems
Like everything else you do in production, take time to evaluate your needs before you jump into implementation. Here are some questions we started asking ourselves:
- Does our production team need to be spread throughout different physical spaces, where our vocal cords aren’t an option?
- Does our team need more than a single group channel, ruling out simple options like a group voice call?
- Do we need very low (unnoticeable) latency in our communications?
- Are we willing to maintain some software infrastructure, and put some load on our existing network?
- Is our WiFi capable enough to handle network-supported audio communications?
- What are we willing to spend to make sure our team members can communicate effectively throughout a service?
I’m sure there are other considerations, but these are the main things for us. The reason we decided to go with Mumble is that we decided:
- We need multiple communication channels, and the ability for some people (our producer or director) to broadcast to different/multiple channels as needed and dynamically
- We have a budget of $0 😆 (not really, but the only money we’ve spent on comms so far is on headsets for our team)
- I have a background in information technology, so I’m very comfortable with our network and my ability to make software work
If the first two points sound about right for you, my hope is that I can help you get past any issues you may have related to the third, and get you set up with really effective comms, literally for free. Let’s do this!
Getting Started with Mumble
1. Murmur: the Mumble server
The brains of your Mumble communications will be a server component called Murmur. You can download the server component here. Note that on that page, for macOS there are separate downloads for the client, and the static server. If you’re running on macOS, make sure you download the “Static macOS server” version. Murmur can be run on macOS, Windows, or Linux.
The instructions for setting up Murmur are here. At this stage you may be thinking that this is over your head, but I’d encourage you to press on: this is by far the most challenging part of this setup! I won’t go through every detail here, but if you get stuck somewhere please get in touch with me using the contact button on the bottom-right of this page. I’m happy to help get you through any hurdles you get stuck on. Here are just some basic points to keep in mind to help you through the process
- Murmur needs to be running anytime you need comms, so make sure it’s on a reliable system that will be on during any production (we run it on our ProPresenter Mac Pro in the background) and set it up to start as soon as the computer is booted if possible.
- It needs to be on a computer that is connected to the network all of your Mumble clients (like phones or tablets). If you have multiple networks or VLANS, you’ll need to ensure you can route between those networks correctly.
- When you’re setting it up, you’ll use a super user account for the basic configuration, but this user does not actually work for sending or receiving any audio.
2. Mumble: setting up your comms stations
Mobile Communication Stations
Once Murmur is up and running on your server, the next step is to ensure you can connect to it from your Mumble “stations”. The simplest version to use is the mobile version for Android (called “Plumble”) or iOS. Simply install the App, open it, and view “LAN servers”. As long as your server is on the same network as your mobile device and your network is allowing Bonjour, it should show up. If it doesn’t, you may need to add your server by IP address using “Favourite servers”. If you still can’t get it connected, check with your IT support (if you have one), or get in touch with me.
Without a headset or headphones, your mobile devices will act as a sort of speakerphone, which doesn’t work very well in most environments. By default, the mobile Apps are configured to be “push to talk”. That works okay, but what we found works very well without being too expensive, is to use a headset like the JBL Quantum 100. These are cheap, but fairly isolating headsets with a built-in mic and–importantly–a mute switch! If you’re using a headset with a mute switch, you can simply plug it into your mobile device and configure Mumble to be “continuous”, and use the mute switch on the headset when you need to talk.
Desktop/Laptop Stations
The Mumble client can also be run on a desktop OS like Windows, macOS, or Linux. It is very similar to the mobile client but includes some additional functionality, like shortcuts (more on those later), volume/signal-based voice activation, and lots of other little options. If you have computers you’re using for ProPresenter, audio, or lighting that are connected to the same network as your Murmur server, you can simple hook up a headset or some sort of a microphone and speaker and use these stations as communications clients as well.
3. Configuring communication channels or groups
Okay, at this point you have wireless comms ready to go–amazing! If your production team only needs a single group or channel you don’t really need to do anything else. Everyone just connects, joins the default channel, and can talk to and hear everyone else at the same time.
As soon as your team gets a bit bigger though, you’ll quickly notice that certain people want to hear things, while others don’t. For example, your audio engineer may be on comms, but may not want to hear all the chatter related to camera operation. You may want everyone to hear a producer or a musical director, and you may want a producer to be able to talk to your band, but you probably don’t want your band to hear your camera director!
This can be handled in Mumble/Murmur by configuring channels. Channels can be configured by Murmur’s SuperUser account, or any user who has been registered on the server and given permissions to manage channels.
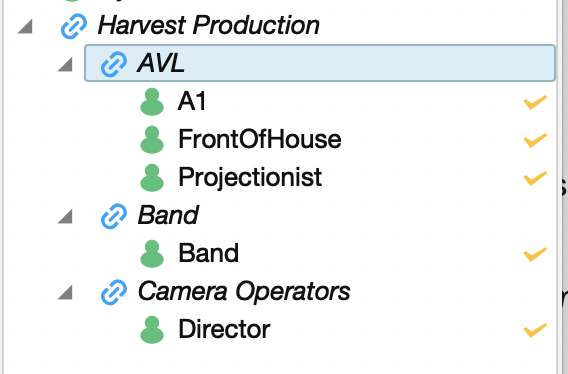
Channels are essentially just nested groups. For our production team, we have our Murmur server configured as follows:
- Production: a root channel that contains everything else
- Audio/Video/Lighting (AVL): for our front of house and broadcast audio engineers, our ProPresenter (video) operator, and our lighting operator
- Camera Ops: for our camera/video director, and camera operators
- Band: a special channel we use to talk directly to our band’s in-ears (more on how that works later)
Here is what it looks like with a few users connected:
Pretty simple! If your groups are always exclusive–meaning everyone in a group only wants to talk to and hear from people in only that group, you don’t have to do anything else! That’s how channels work by default in Murmur.
If you’re like our team though, you’ll quickly realize that sometimes you want your camera director to talk to your AVL team. You may also want everyone in every channel to hear from your musical director, and you may have a producer you want to be able to pick and choose which sets of channels they’re talking to as needed. This is where things get a bit more complicated, but fortunately–Murmur can handle this too with just a bit more set up!
Adding Mumble Shortcuts for Dynamic Channel Speak
First, let’s consider a scenario where you have teams like the ones I created channels for above, but you have a producer or some other person who you want to be able to hear from everyone, and talk to different groups as needed. Let’s tackle the easy problem first: picking a group or multiple groups to speak to, which we can do with Mumble’s shortcuts, which are available on Mumble for Windows or macOS.
To set this up, simply:
- Connect Mumble to your server on your Windows or macOS system
- Open Settings/Preferences (they’re named differently on Windows/macOS)
- G to the Shortcuts tab on the left
- Click “Add”
- Set the “Function” to “Whisper/Shout”
- Click under “Shortcut” and hit the key you’d like to use as a hotkey
- You need to be a bit careful here to use a key combination that isn’t used for anything else. We use F8, F9, and F10, which seem to be generally free. You can also do key combinations, like control-alt-a, or command-option-b. Depending on what other applications your computer is using, make sure you test to confirm that these keys don’t do something you’re not expecting!
- Finally, click the “Data” field, “Shout to Channel”, and pick the channel you want to talk to
That’s it! Regardless of the primary channel this computer is in, you can now immediately talk to the other channel by pressing and holding the configured shortcuts. You can configure additional shortcuts for additional channels or user groups you need to talk to from this station. A configured shortcut looks something like this:

Bonus Marks: MIDI or Stream Deck Shortcuts
You may find these hotkeys difficult to remember or find. Without going into detail here you can fairly easily set up buttons on a MIDI control surface (like a Korg nanoKONTROL), or an Elgato Stream Deck (we love these things!) to trigger these shortcuts. You can also use surfaces like this to adjust your shortcuts to be “latch” (press to turn on, press again to turn off) instead of the defaults (push and hold while you’re talking).
Okay, that works great for talking to multiple channels. But what about users who need to hear from multiple channels? Let’s dive into access control lists (ACLs)…
Configuring Who Hears What with Access Control Lists
In my humble opinion, this is the trickiest part of Murmur to understand. As I said earlier, the default behaviour is that a user in a channel can only hear from or speak to that channel, unless they’re using a shortcut to shout temporarily to another channel. This default behaviour can be modified using channel linking, and access control lists.
Channel linking simply joins two channels together. To link two channels, make sure you’re logged in with a user who has the correct permissions (like the SuperUser), join a channel, and then right-click the one you want to link, and click “Link”. Now, it may seem like this defeats the purpose of having separate channels, but ACLs can help us filter that behaviour. For our server, we have all the channels linked, including the sub channels (like “AVL”) being linked with the parent channel (“Production”). This means that–without any ACLs), everyone in every channel can talk to and hear from everyone else.
ACLs allow us to further filter who hears what. Let’s start by making it so anyone in the “Production” (parent) channel can hear from everyone in any sub channel, but the sub channels can’t hear each other. This is handy in particular for our producer, who needs to hear from everyone, even though we don’t want everyone hearing from each other. To do this, we’re going to modify the ACLs for our parent channel (“Production”):
- Log in with a user that has the correct permissions
- Right-click the parent channel and click “Edit”
- Add three new ACLs, in this order:
- [Apply to this AND sub channels] @all allow speak
- [Apply to sub channels] @~sub,0,1 deny speak
- [Apply in this AND sub channels] @in allow speak
Before saving the changes, make sure the ACLs listed look correct. I’ve found it’s a bit finicky editing the ACLs and sometimes I’ve needed to edit things to get it right. If you want to better understand what is happening, this scenario is specifically covered in the Mumble wiki here.
Once you’ve done this, a user in the parent channel should be able to hear from and speak to all the sub-channels, but the sub-channels shouldn’t hear from other “peer” channels.
4. A Few Extras
Here is a brief list of some other things you may be interested in, depending on your setup:
Advanced Audio Routing
Besides a directly-connected headset, there are a few other options for comms routing. A great example is a front-of-house audio engineer, who is likely operating a console with a built-in PAFL and talkback system. A lot of current digital consoles allow you to route a feed into the engineers PAFL and send the talkback somewhere. We use Dante and the GLD-80’s I/O module to feed this audio over Dante to a computer running a Mumble station for the engineer. This allows the engineer to have a single headset and mic they can use to easily stay on comms and a mic they can use to communicate to the AVL group on Mumble.
Broadcast Audio Feed
Some of your team members may want to hear a copy of your broadcast or house audio feed in their headset. There is a few ways to do this:
First, for team members using a computer as their Mumble client, you can feed the audio into an input on your computer’s soundcard or an audio interface. Mumble actually natively supports “ducking” on Windows, so if you set it up so Windows is playing that input (your broadcast feed) out the output your headset is plugged into, Mumble can be configured to “duck” the broadcast audio when someone is talking. If you have Dante, Dante Virtual Soundcard is a great way to route a broadcast feed to computers running as Mumble clients, either on Windows or macOS.
For team members using the mobile client, we use a computer who’s sole purpose is to receive the broadcast mix in an interface that is used as the “mic” for Mumble. That user is configured to “speak” to the channels/users that need to hear the mix. It’s going to be compressed and slightly delayed, but if a team member just needs a reference, this can work.
WiFi
Of course your mobile Mumble clients depend on your WiFi. Dropouts, high latency, and other issues point at a WiFi infrastructure that might not be sufficient for Mumble. You may need additional access points or a dedicated SSID for your comms. If you get stuck, feel free to reach out! I’m always happy to chat and see if I can help.
Conclusion
Hey, Mumble may not be the right option for you. That’s fine! But if you are getting to the point where effective communication between members of your production team is important, but you don’t have the budget for a “classic” system, going through the pain of getting Mumble up and running might be worthwhile.
Hope this helps! If you have other solutions, or if you find ways of making Mumble more useful please leave it in the comments!